SmartVyapar User ManualSmartVyapar વપરાશ માર્ગદર્શિકા
Everything you need to run your business — billing, GST, inventory, accounting and reports — explained step by step. Follow the sections in order the first time, then jump to whatever you need. તમારો ધંધો ચલાવવા માટેની દરેક વસ્તુ — બિલિંગ, GST, સ્ટોક, હિસાબ અને રિપોર્ટ — સ્ટેપ-બાય-સ્ટેપ સમજાવેલ. પહેલી વાર sections ક્રમમાં અનુસરો, પછી જે જોઈએ ત્યાં સીધા જાઓ.
Introductionપરિચય
What SmartVyapar is, who it is for, and a few simple ideas that make everything click.SmartVyapar શું છે, કોના માટે છે, અને થોડા સરળ ખ્યાલ જે બધું સમજાવી દે.
What is SmartVyapar?SmartVyapar શું છે?
SmartVyapar is a cloud-based business management system for Indian small and medium businesses. You create invoices, manage customers and stock, record payments and expenses, and get GST-ready reports — all from any device through a web browser. No installation, automatic backups, and your whole team can work together. SmartVyapar એ ભારતીય નાના-મધ્યમ ધંધા માટેનું cloud-આધારિત બિઝનેસ મેનેજમેન્ટ સિસ્ટમ છે. તમે invoice બનાવો, ગ્રાહક અને સ્ટોક સંભાળો, payment અને ખર્ચ નોંધો, અને GST-ready રિપોર્ટ મેળવો — બધું જ ગમે તે device પરથી web browser દ્વારા. કોઈ installation નહીં, automatic backup, અને આખી team સાથે કામ કરી શકે.
Who is it for?કોના માટે છે?
Traders, retailers, wholesalers, distributors and service providers who want proper billing, stock control and accounting in one place — whether you are a single owner or a team with an accountant, cashier and salespeople. વેપારી, retailer, wholesaler, distributor અને service આપનારા — જેમને એક જ જગ્યાએ બરાબર બિલિંગ, સ્ટોક અને હિસાબ જોઈએ — પછી ભલે તમે એકલા માલિક હો કે accountant, cashier અને salesman વાળી team હો.
A few key ideasથોડા મુખ્ય ખ્યાલ
Companyકંપની
Your business inside SmartVyapar. All your data lives under your company.SmartVyapar અંદર તમારો ધંધો. તમારો બધો data તમારી કંપની હેઠળ રહે છે.
Voucherવાઉચર
Any document you create — invoice, payment, journal. Each gets a unique number.તમે બનાવેલ કોઈપણ દસ્તાવેજ — invoice, payment, journal. દરેકને unique નંબર મળે.
GSTGST
CGST+SGST within your state, IGST for other states — calculated automatically.તમારા રાજ્યમાં CGST+SGST, બીજા રાજ્ય માટે IGST — આપોઆપ ગણાય.
Double-entryડબલ-એન્ટ્રી
Every transaction updates two sides, so your books always balance.દરેક વ્યવહાર બે બાજુ અપડેટ કરે, એટલે તમારા ચોપડા હંમેશા tally રહે.
How to use this manualઆ માર્ગદર્શિકા કેમ વાપરવી
- Use the EN / ગુ button (top-right) to switch language anytime.EN / ગુ button (ઉપર-જમણે) થી ગમે ત્યારે ભાષા બદલો.
- Use the search box to find any topic quickly.search box થી કોઈપણ વિષય ઝડપથી શોધો.
- First time? Read sections 0 → 3 in order, then start billing from section 4.પહેલી વાર? sections 0 → 3 ક્રમમાં વાંચો, પછી section 4 થી બિલિંગ શરૂ કરો.
Getting Startedશરૂઆત
Create your company, sign in, and find your way around the screen.તમારી કંપની બનાવો, login કરો, અને screen પર ફરવાનું શીખો.
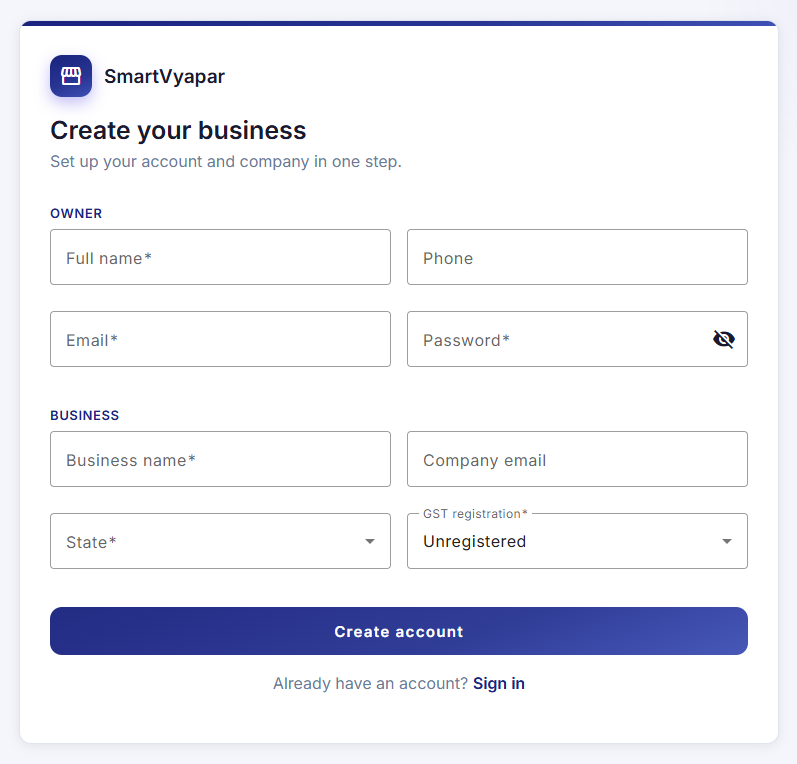
Register your companyતમારી કંપની register કરો
Logging inLogin કરવું
After the first time, just go to the login page, enter your email and password, and click Login. You stay signed in on that device until you log out.પ્રથમ વાર પછી, login page પર જઈ email અને password નાખી Login કરો. Logout ન કરો ત્યાં સુધી તે device પર signed-in રહો છો.
The dashboardDashboard
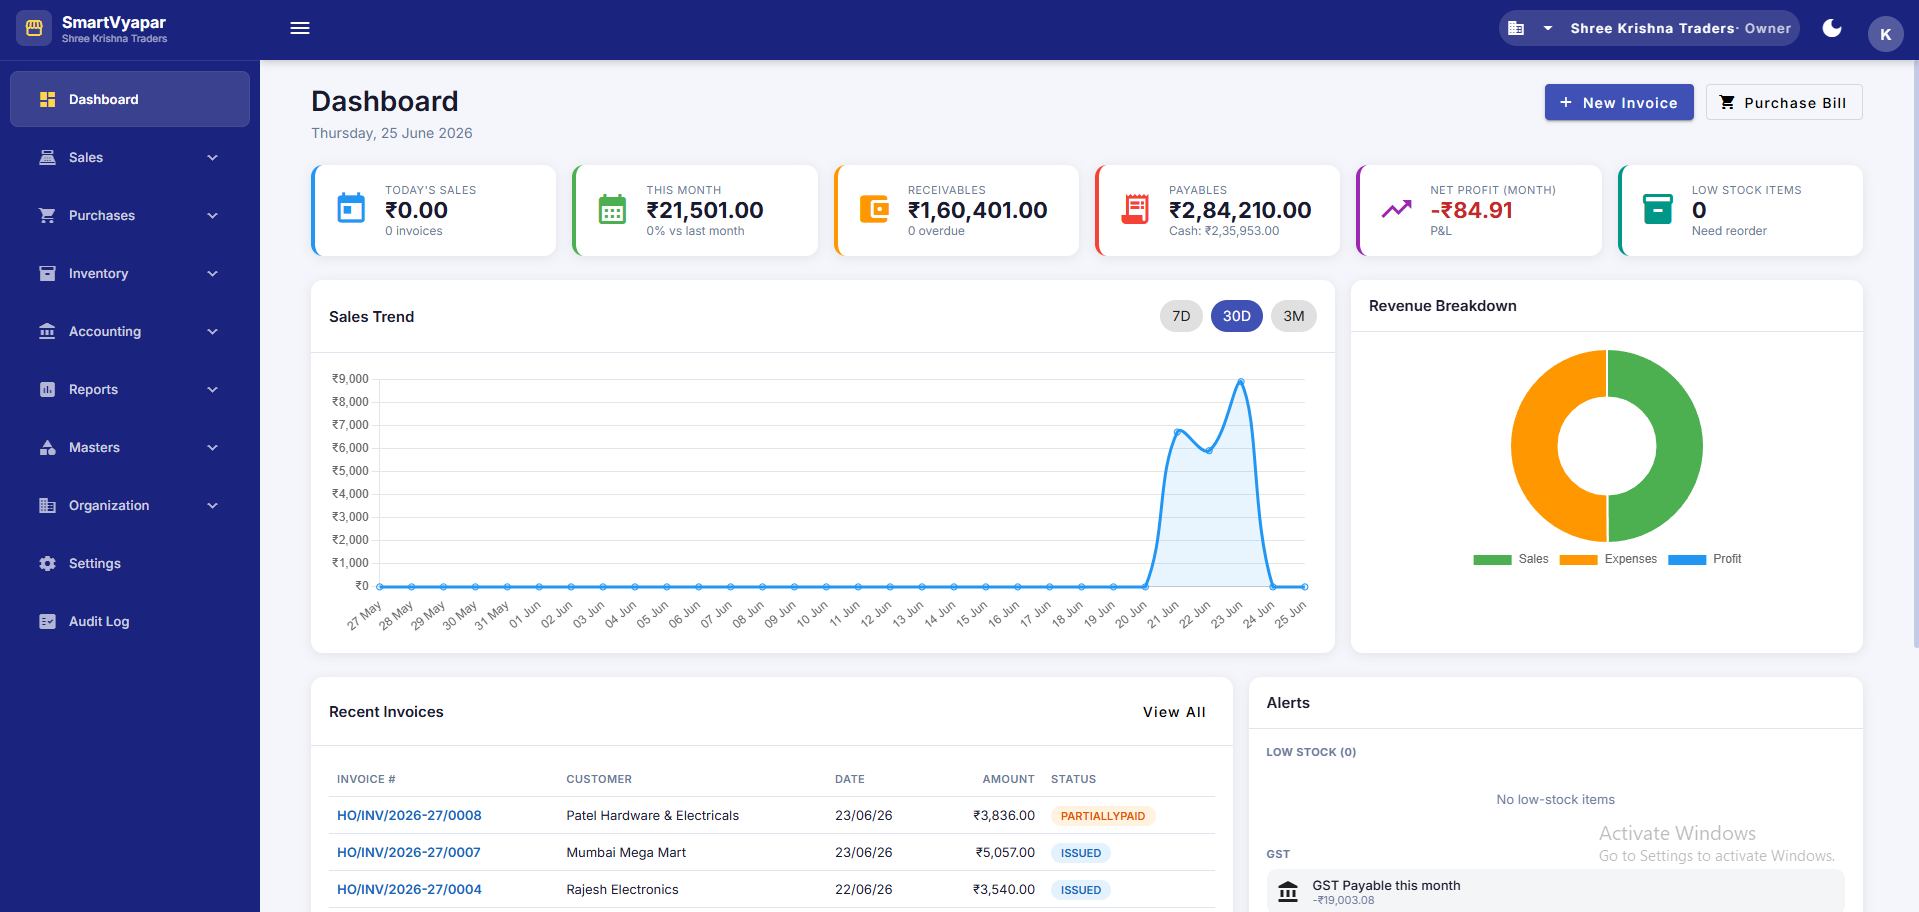
The dashboard is your business at a glance: today's sales, this month's revenue, money to receive and pay, low-stock alerts, a sales trend chart, and your top customers and products.Dashboard એ એક નજરમાં તમારો ધંધો: આજનું વેચાણ, આ મહિનાની આવક, લેવાના-આપવાના પૈસા, low-stock alert, sales trend chart, અને top ગ્રાહક અને products.
Finding your way aroundScreen પર ફરવું
| Areaજગ્યા | What it isશું છે |
|---|---|
| Left menuડાબું menu | All modules, grouped. Click a group to expand it.બધા modules, જૂથમાં. જૂથ પર ક્લિક કરી ખોલો. |
| Top barઉપરની પટ્ટી | Your company name, role, account menu (profile, change password, logout) and light/dark theme.તમારી કંપનીનું નામ, role, account menu (profile, password બદલો, logout) અને light/dark theme. |
| Back buttonBack button | Top-left of most pages — returns to the previous screen.મોટાભાગના pages ની ઉપર-ડાબે — પાછલા screen પર લઈ જાય. |
First-time Setup & Onboardingપ્રથમ સેટઅપ અને Onboarding
Do these once before you start billing — it makes everything afterwards smooth and correct.બિલિંગ શરૂ કરતા પહેલા આ એક વાર કરી લો — પછી બધું સરળ અને સાચું રહે.
Company profileCompany profile
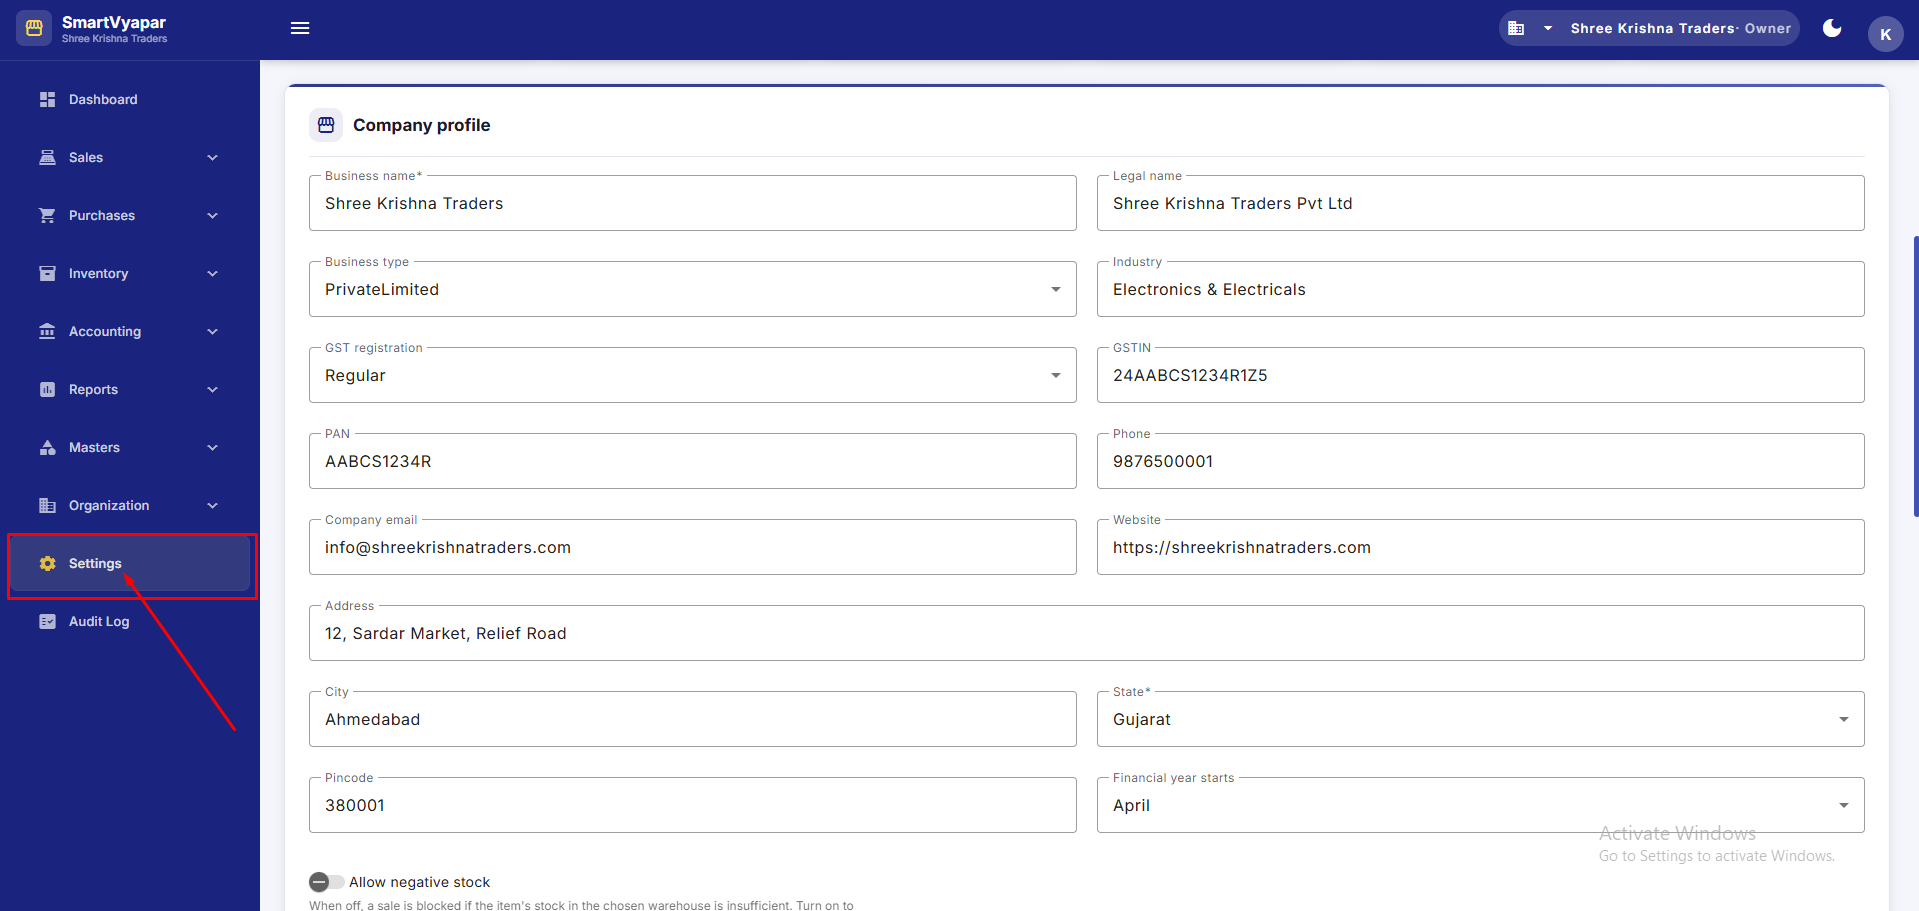
Fill in your business name, GSTIN, PAN, address, state, phone and email. This information prints on your invoices, so keep it accurate. Click Save profile.તમારું ધંધાનું નામ, GSTIN, PAN, સરનામું, રાજ્ય, ફોન અને email ભરો. આ માહિતી તમારા invoice પર છપાય છે, એટલે સાચી રાખો. Save profile ક્લિક કરો.
PreferencesPreferences
- Allow negative stock — keep OFF to block a sale when stock is short; turn ON to allow stock below zero.Allow negative stock — સ્ટોક ઓછો હોય ત્યારે વેચાણ રોકવા OFF રાખો; શૂન્યથી નીચે જવા દેવા ON કરો.
- Credit limit enforcement — Off / Warn / Block when a customer crosses their credit limit.Credit limit enforcement — ગ્રાહક પોતાની credit limit વટાવે ત્યારે Off / Warn / Block.
- Financial year start — usually April for India.Financial year start — ભારત માટે સામાન્ય રીતે એપ્રિલ.
Document numberingDocument numbering
Set the prefix, next number and padding for each document type (invoice, quotation, etc.). For example, prefix INV with padding 4 gives INV/2025-26/0001. Numbers then increase automatically.દરેક document પ્રકાર (invoice, quotation વગેરે) માટે prefix, next number અને padding સેટ કરો. દા.ત. prefix INV અને padding 4 એટલે INV/2025-26/0001. પછી નંબર આપોઆપ વધે છે.
Import your existing data (Excel)તમારો જૂનો data import કરો (Excel)
Moving from another software? Bring in your Parties and Items in bulk instead of typing each one.બીજા software પરથી આવો છો? એક-એક type કરવાને બદલે તમારા Parties અને Items bulk માં લાવો.
Opening balancesOpening balances
So your books are correct from day one, enter what existed on your cut-off date:પ્રથમ દિવસથી ચોપડા સાચા રહે માટે, તમારી cut-off date પર જે હતું તે નાખો:
- Party opening balance — how much each customer owes you / you owe each supplier (set while adding the party or in the import).Party opening balance — દરેક ગ્રાહક પાસેથી લેવાના / દરેક supplier ને આપવાના (party ઉમેરતી વખતે કે import માં સેટ કરો).
- Item opening stock — quantity and rate on hand (set on the item or in the import).Item opening stock — હાથ પરનો જથ્થો અને ભાવ (item પર કે import માં સેટ કરો).
- Cash & Bank opening — set when you create each Cash/Bank account.Cash & Bank opening — દરેક Cash/Bank account બનાવતી વખતે સેટ કરો.
Add your team (optional)તમારી team ઉમેરો (optional)
Invite staff and give each a role (e.g. Accountant, Cashier, Salesperson). Roles decide what each person can see and do. More in Settings & Admin.સ્ટાફને invite કરો અને દરેકને role આપો (દા.ત. Accountant, Cashier, Salesman). Role નક્કી કરે કે દરેક વ્યક્તિ શું જોઈ-કરી શકે. વધુ Settings & Admin માં.
Mastersમાસ્ટર્સ
Your reference data — customers, suppliers, products and accounts. Set these up once; everything else uses them.તમારો સંદર્ભ data — ગ્રાહક, supplier, products અને accounts. એક વાર બનાવો; બાકી બધું એને વાપરે.
Parties (Customers & Suppliers)Parties (ગ્રાહક અને Supplier)
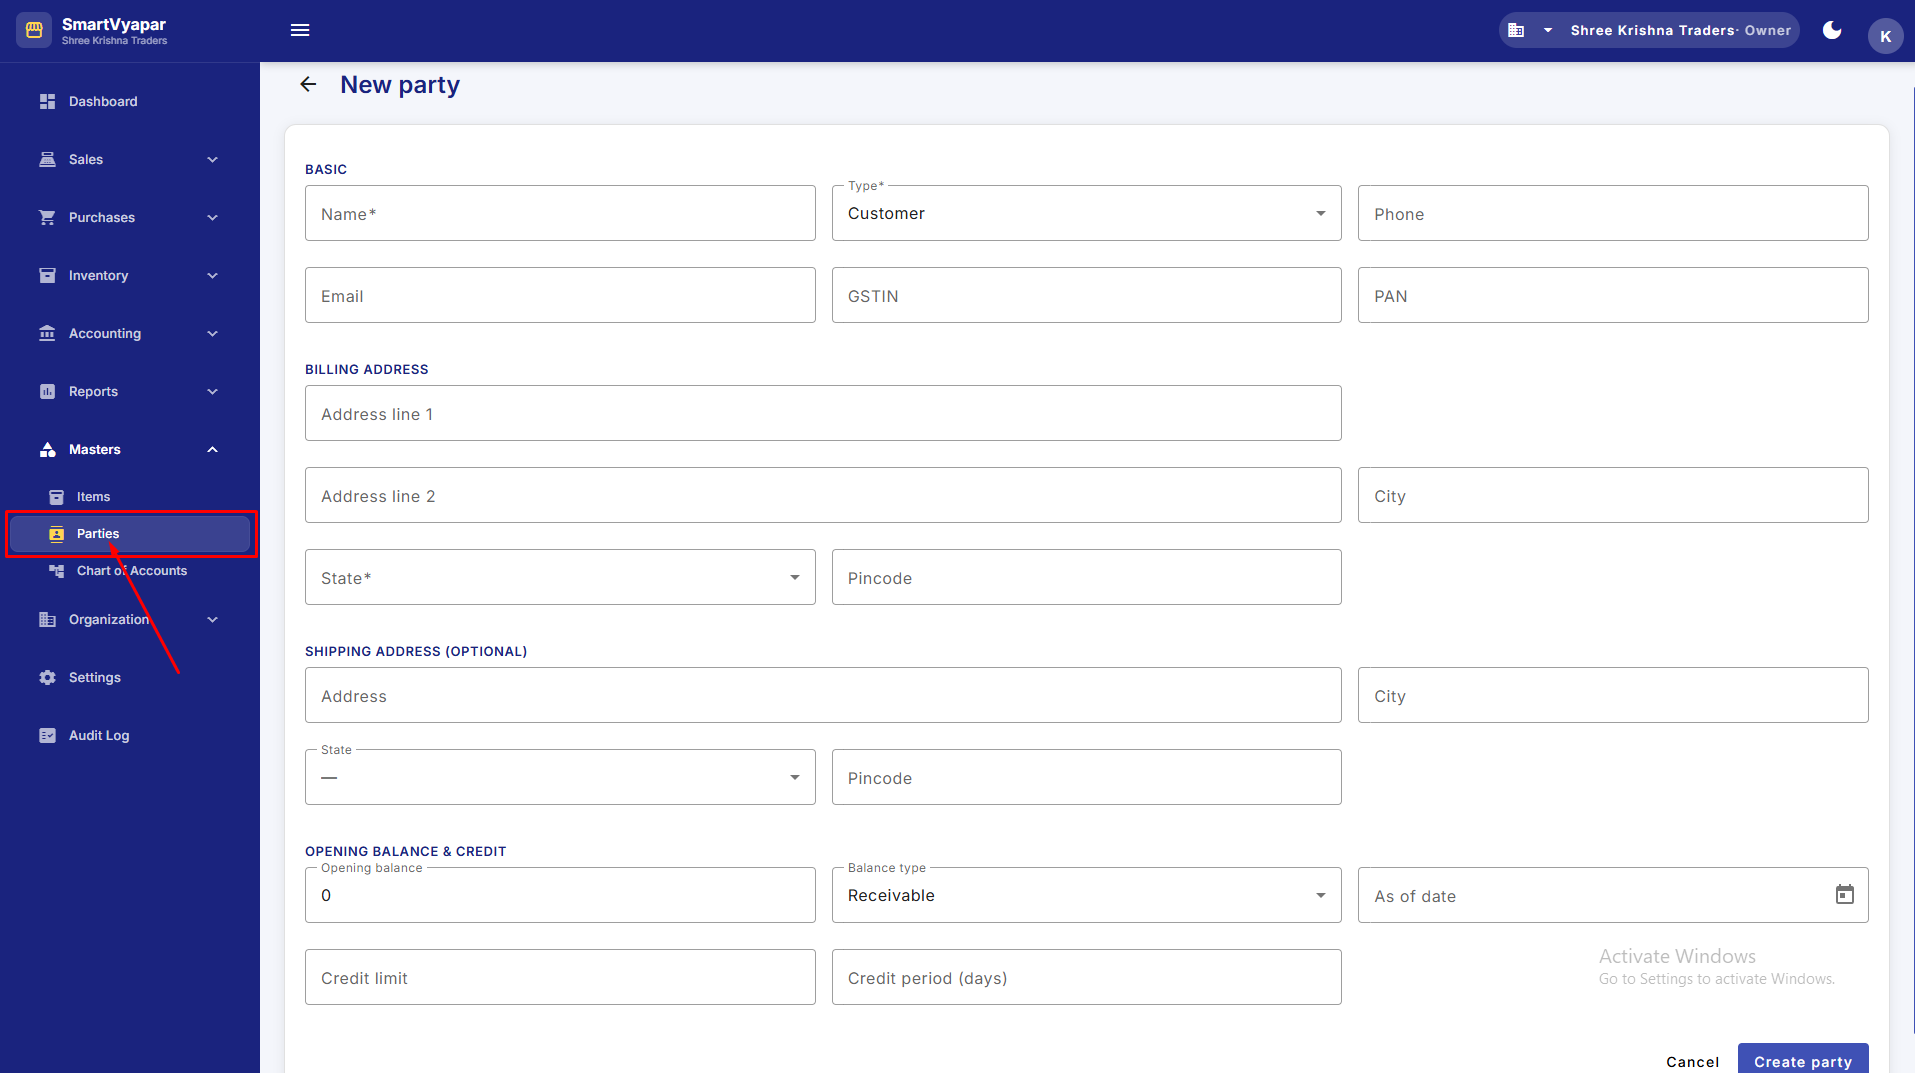
A party is anyone you do business with. A party can be a Customer, a Supplier, or Both.Party એટલે જેની સાથે તમે ધંધો કરો છો. Party એ Customer, Supplier, કે Both હોઈ શકે.
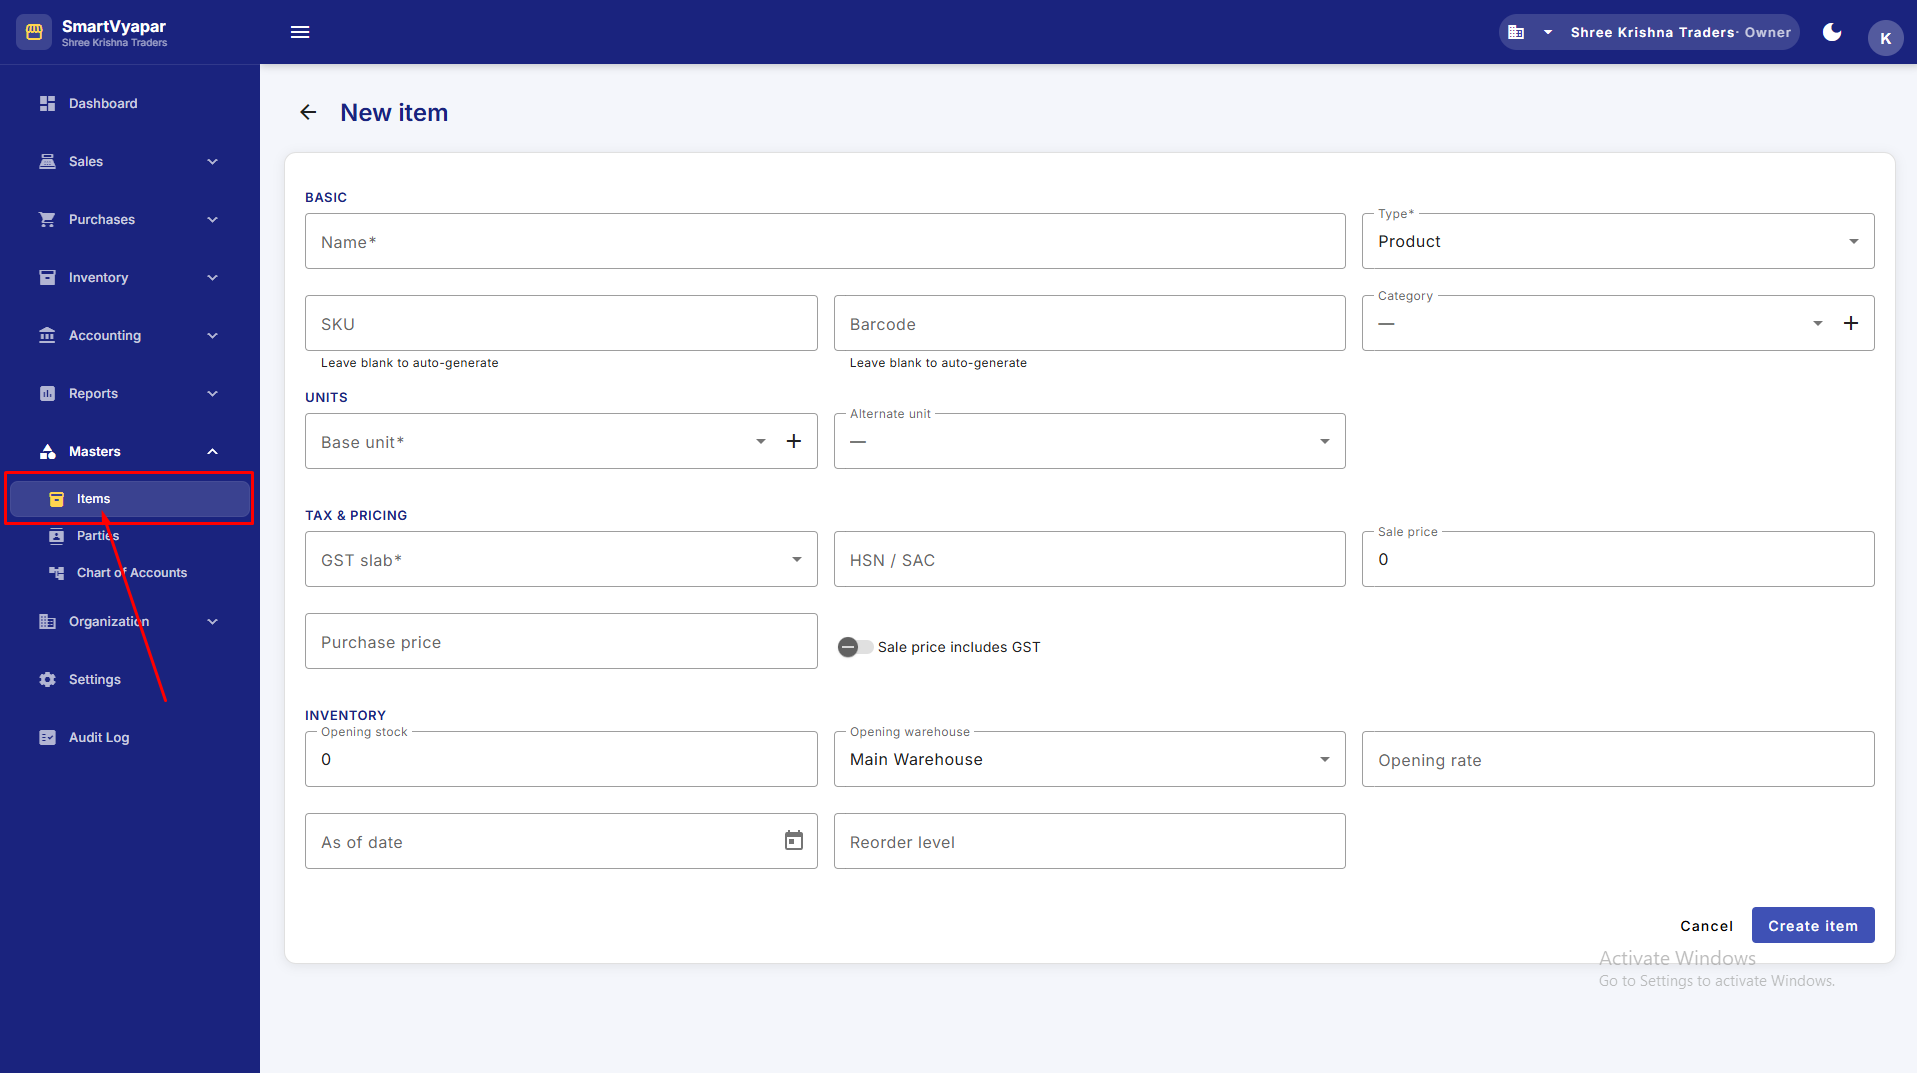
Items (Products & Services)Items (Products અને Services)
An Item is what you sell or buy. Choose Product (stock is tracked) or Service (no stock).Item એટલે જે તમે વેચો કે ખરીદો. Product (સ્ટોક track થાય) કે Service (સ્ટોક નહીં) પસંદ કરો.
Cash & Bank accountsCash અને Bank accounts
Create one account per cash drawer and bank account. For bank, add the bank name, account number and IFSC. Set the opening balance — payments and expenses then move it automatically.દરેક cash drawer અને bank account માટે એક account બનાવો. Bank માટે bank નામ, account number અને IFSC ઉમેરો. opening balance સેટ કરો — પછી payment અને ખર્ચ એને આપોઆપ બદલે.
Chart of AccountsChart of Accounts
This is the list of ledger heads (Sales, Purchase, expense heads, etc.) your accounting posts to. Standard heads are created for you. Add your own expense heads here (e.g. Rent, Salaries) so you can record expenses against them.આ ledger heads (Sales, Purchase, ખર્ચ heads વગેરે) ની યાદી છે જ્યાં તમારો હિસાબ post થાય. Standard heads તમારા માટે બને છે. તમારા પોતાના ખર્ચ heads (દા.ત. ભાડું, પગાર) અહીં ઉમેરો જેથી એ સામે ખર્ચ નોંધી શકો.
Branches (multi-location)Branches (એકથી વધુ જગ્યા)
If you run more than one shop or office, create a branch for each. Every voucher is tagged to a branch, and document numbers can run branch-wise (e.g. HO/INV/2026-27/0001 vs BR2/INV/2026-27/0001). Mark one as the default branch for new vouchers. A single-location business simply uses the one default branch — you never have to think about it.એકથી વધુ દુકાન કે ઓફિસ ચલાવો તો દરેક માટે branch બનાવો. દરેક voucher branch સાથે tag થાય, અને document number branch-પ્રમાણે ચાલી શકે (દા.ત. HO/INV/2026-27/0001 vs BR2/INV/2026-27/0001). નવા voucher માટે એકને default branch કરો. એક જ જગ્યાવાળો ધંધો એક default branch વાપરે — વિચારવાની જરૂર નથી.
Warehouses (stock locations)Warehouses (સ્ટોકની જગ્યા)
A warehouse is a physical place where stock is kept — a godown, shop floor or store-room. Create one per location and mark one as default. On purchases, sales and transfers you then choose which warehouse the stock moves in or out of. Keep stock in a single place? One default warehouse is all you need.Warehouse એટલે જ્યાં સ્ટોક રખાય તે ભૌતિક જગ્યા — godown, દુકાન કે store-room. દરેક જગ્યા માટે એક બનાવો અને એકને default કરો. પછી ખરીદી, વેચાણ અને transfer વખતે કયા warehouse માં/માંથી સ્ટોક જાય તે પસંદ કરો. એક જ જગ્યાએ સ્ટોક? એક default warehouse પૂરતું.
Salesવેચાણ
From a price quote to a paid invoice — the full selling flow.ભાવ આપવાથી માંડીને paid invoice સુધી — આખો વેચાણ પ્રવાહ.
Quotation / EstimateQuotation / Estimate
A price offer to a customer. It does not affect stock or accounts. When the customer agrees, convert it to a Sales Invoice in one click.ગ્રાહકને ભાવની ઓફર. એ સ્ટોક કે હિસાબ પર અસર નથી કરતું. ગ્રાહક સંમત થાય ત્યારે એક ક્લિકમાં Sales Invoice માં convert કરો.
Status flow: Draft → Sent → Accepted / Rejected → Converted. Marking it Sent also emails the PDF to the customer.Status flow: Draft → Sent → Accepted / Rejected → Converted. Sent કરો એટલે ગ્રાહકને PDF email પણ થાય.
Sales OrderSales Order
A confirmed order to fulfil later. Stock/accounts are untouched until you invoice it. You can fulfil it fully or partly — one order can become several invoices.પછી પૂરો કરવાનો confirmed order. Invoice ન કરો ત્યાં સુધી સ્ટોક/હિસાબ અકબંધ. તમે પૂરો કે અંશતઃ fulfil કરી શકો — એક order માંથી અનેક invoice બની શકે.
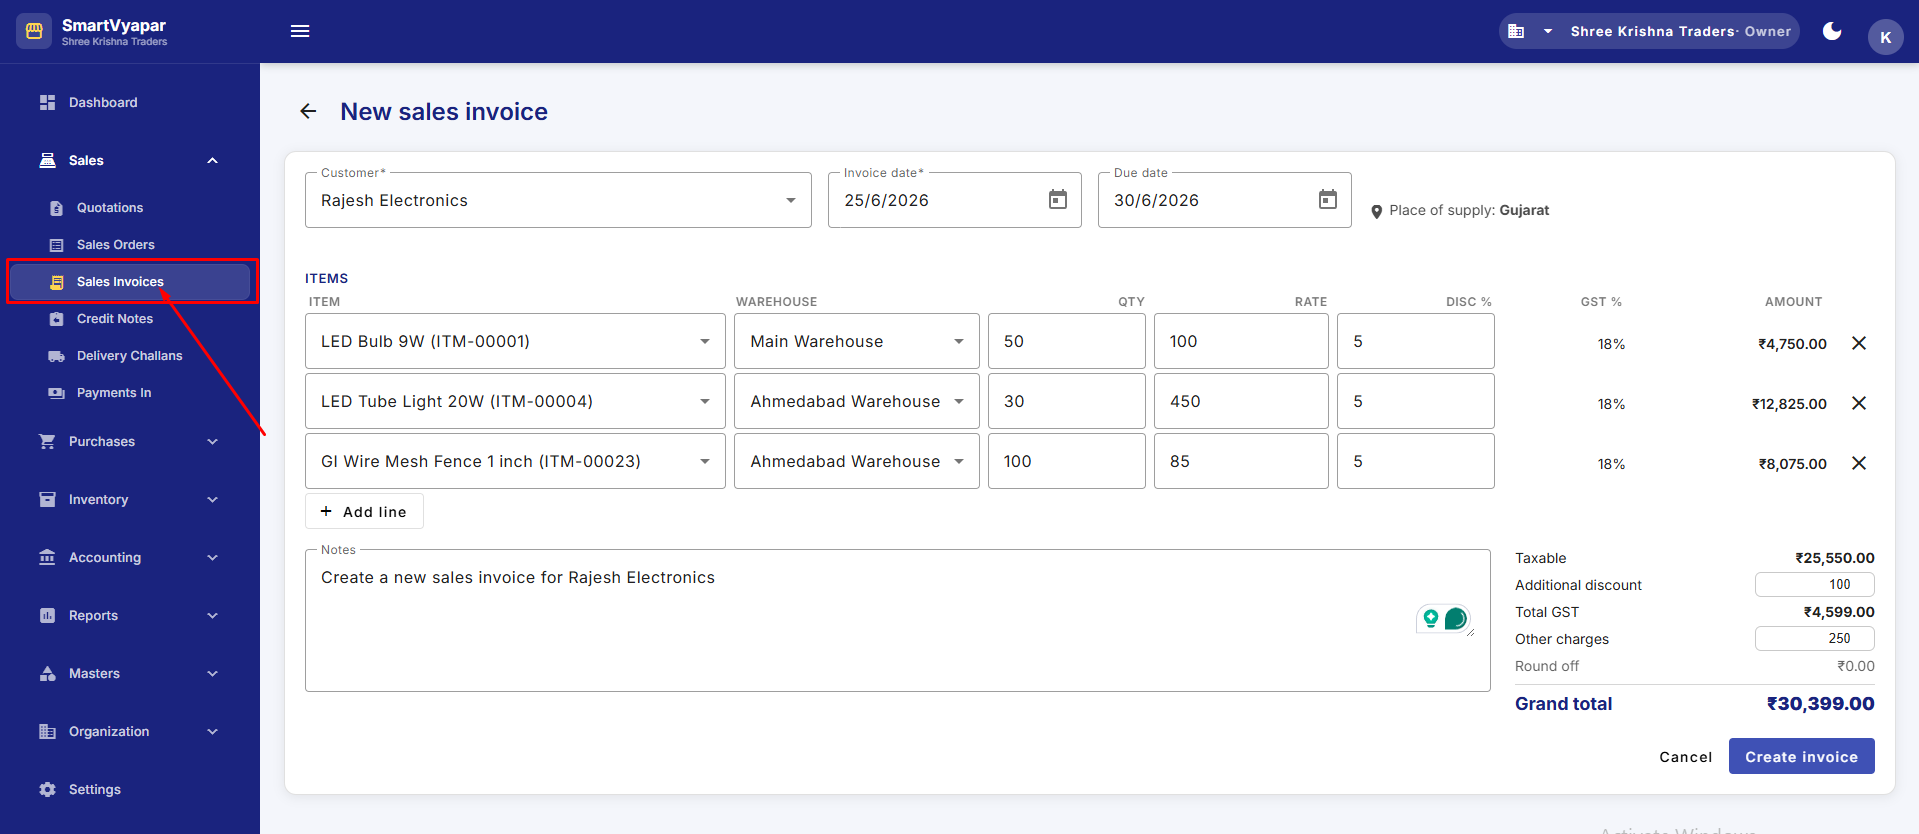
Sales Invoice — the main oneSales Invoice — મુખ્ય
Delivery ChallanDelivery Challan
A document to send goods before billing — for delivery, approval or job-work. It records the despatch but does not post GST or the customer's balance. When the goods are confirmed, convert the challan to a Sales Invoice (stock and accounts post then).બિલ પહેલા માલ મોકલવાનો દસ્તાવેજ — delivery, approval કે job-work માટે. એ despatch નોંધે પણ GST કે ગ્રાહકનો balance post નથી કરતું. માલ confirm થાય ત્યારે challan ને Sales Invoice માં convert કરો (ત્યારે સ્ટોક અને હિસાબ post થાય).
Credit Note (Sales Return)Credit Note (વેચાણ પરત)
When a customer returns goods. Create it (optionally "against an invoice" to prefill). Stock comes back in, GST and the customer's balance reduce — all automatically.ગ્રાહક માલ પરત કરે ત્યારે. એ બનાવો (વૈકલ્પિક "invoice સામે" prefill માટે). સ્ટોક પાછો આવે, GST અને ગ્રાહકનો balance ઘટે — બધું આપોઆપ.
Payment In (receive money)Payment In (પૈસા મેળવો)
Purchasesખરીદી
Buying from suppliers — the mirror image of Sales.Supplier પાસેથી ખરીદી — Sales નું પ્રતિબિંબ.
Purchase OrderPurchase Order
An order you place with a supplier. No stock/accounts change until you record the purchase invoice. Convert fully or partly into purchase invoices.તમે supplier ને આપતો order. Purchase invoice નોંધો ત્યાં સુધી સ્ટોક/હિસાબ ન બદલાય. પૂરો કે અંશતઃ purchase invoice માં convert કરો.
Purchase Invoice (record a bill)Purchase Invoice (bill નોંધો)
Debit Note (Purchase Return)Debit Note (ખરીદી પરત)
When you return goods to a supplier. Stock goes out, the supplier's payable reduces, and Input GST is reversed — automatically. Optionally create it "against a bill".તમે supplier ને માલ પરત કરો ત્યારે. સ્ટોક બહાર જાય, supplier ને આપવાનું ઘટે, અને Input GST ઉલટાય — આપોઆપ. વૈકલ્પિક "bill સામે" બનાવો.
Payment Out (pay money)Payment Out (પૈસા ચૂકવો)
Just like Payment In, but for paying suppliers. Pick the supplier, see their outstanding bills, enter the amount and cash/bank, allocate to bills, and save.Payment In જેવું જ, પણ supplier ને ચૂકવવા માટે. Supplier પસંદ કરો, એમના બાકી bills જુઓ, રકમ અને cash/bank નાખો, bills સામે allocate કરી save કરો.
Inventoryસ્ટોક
See and control your stock. Most of this updates by itself from your sales and purchases.તમારો સ્ટોક જુઓ અને નિયંત્રિત કરો. મોટાભાગનું વેચાણ-ખરીદીથી જાતે અપડેટ થાય.
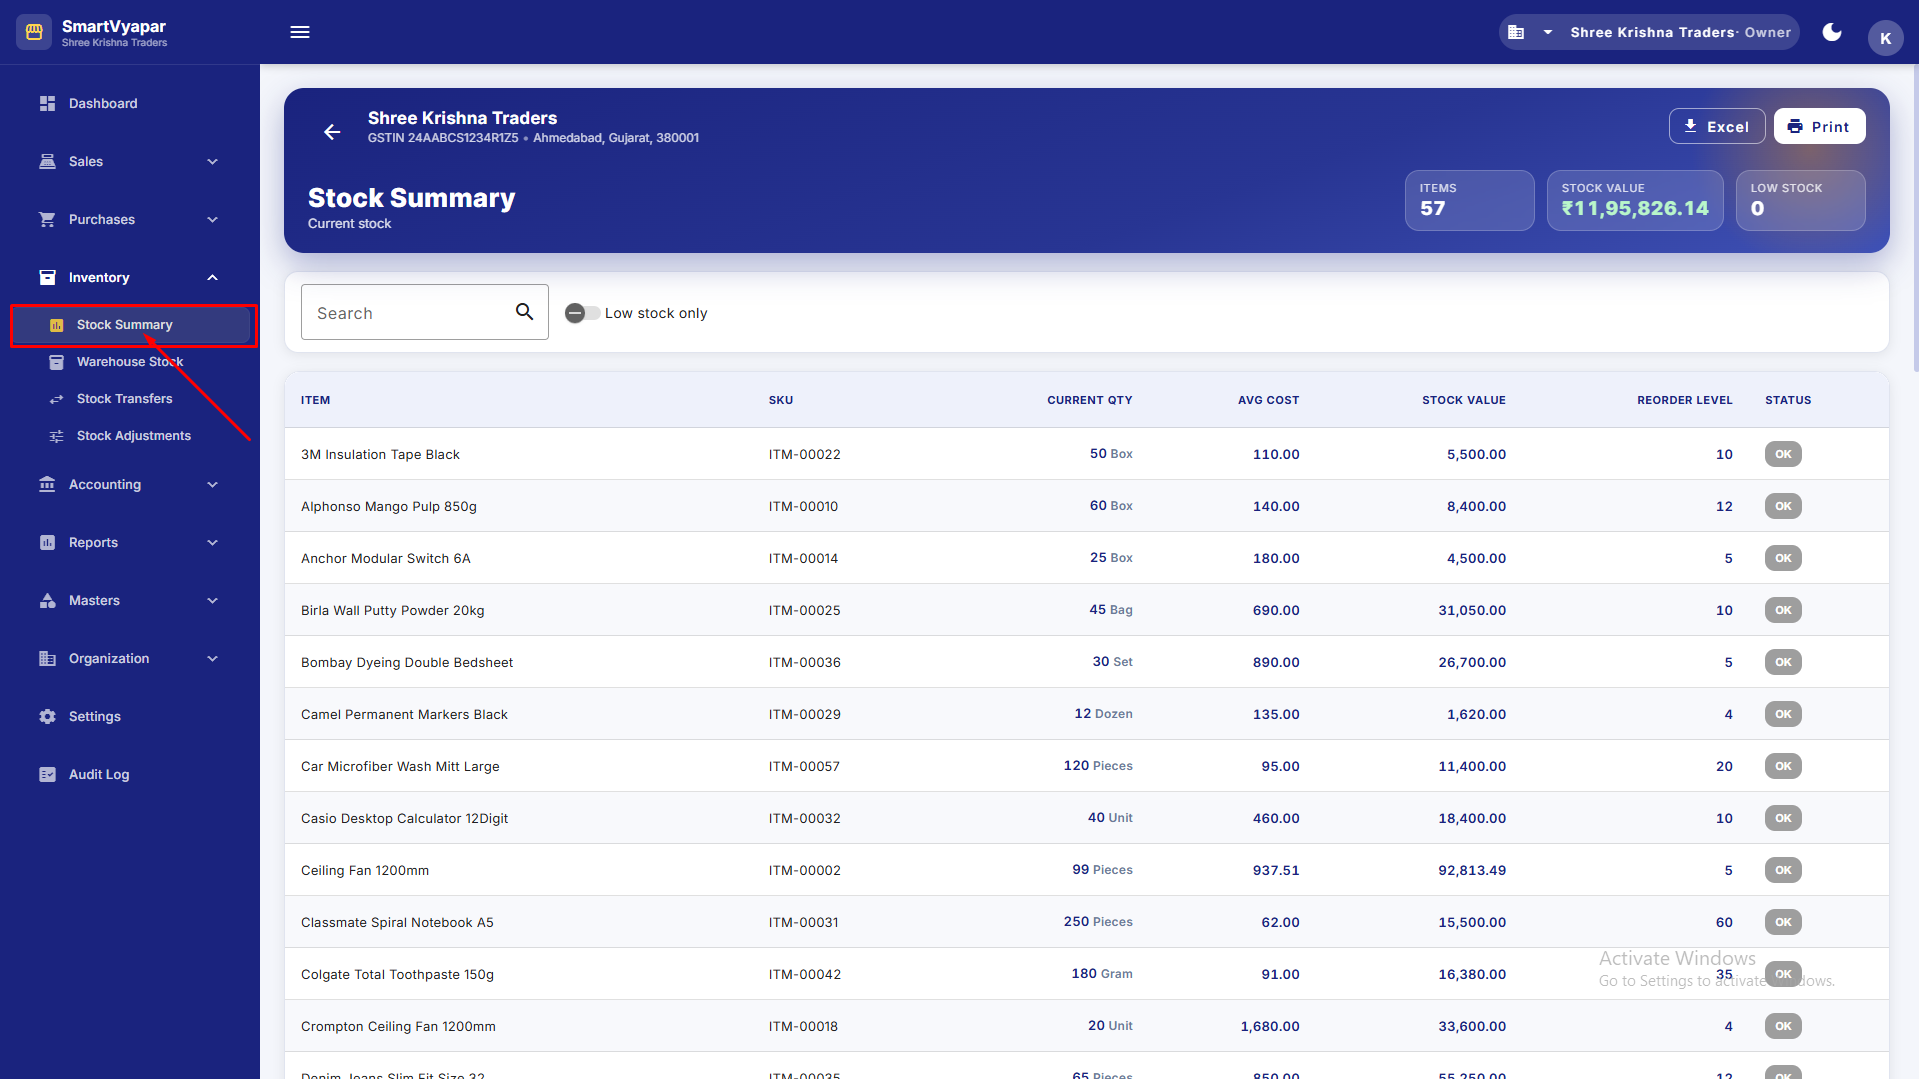
Stock SummaryStock Summary
Every product with its current quantity, average cost, stock value and reorder level. Use the Low stock only toggle to see what needs reordering. Click a row to open its stock ledger (every movement in and out).દરેક product તેના વર્તમાન જથ્થા, સરેરાશ cost, stock value અને reorder level સાથે. શું ફરી મંગાવવું તે જોવા Low stock only toggle વાપરો. row પર ક્લિક કરી તેનું stock ledger (દરેક આવક-જાવક) ખોલો.
Warehouse StockWarehouse Stock
If you keep stock in more than one location, this shows the quantity of each item per warehouse — so you know exactly where your stock is.એકથી વધુ જગ્યાએ સ્ટોક રાખો, તો આ દરેક item નો જથ્થો warehouse પ્રમાણે બતાવે — જેથી તમારો સ્ટોક ક્યાં છે તે ખબર પડે.
Stock TransfersStock Transfers
Move stock from one warehouse to another. Pick the from and to warehouses, add the items and quantities, and save. Your total stock stays the same — only the location changes.એક warehouse થી બીજામાં સ્ટોક ખસેડો. from અને to warehouse પસંદ કરો, items અને જથ્થો ઉમેરી save કરો. તમારો કુલ સ્ટોક એ જ રહે — ફક્ત જગ્યા બદલાય.
Stock AdjustmentsStock Adjustments
Correct the quantity after a physical count — for damage, loss or found stock. Enter the new/extra quantity with a reason.ભૌતિક ગણતરી પછી જથ્થો સુધારો — નુકસાન, ઘટ કે મળેલ સ્ટોક માટે. કારણ સાથે નવો/વધારાનો જથ્થો નાખો.
Accountingહિસાબ
Cash, bank, expenses and the books — mostly automatic, with a few manual tools when you need them.Cash, bank, ખર્ચ અને ચોપડા — મોટાભાગે આપોઆપ, જરૂર પડે ત્યારે થોડા manual સાધનો.
Cash & BankCash & Bank
View each account's balance and its transactions. Balances move automatically as you receive/pay money and record expenses.દરેક account નો balance અને તેના વ્યવહાર જુઓ. પૈસા લો/આપો અને ખર્ચ નોંધો તેમ balance આપોઆપ બદલાય.
ContraContra
Move money between your own cash and bank accounts — e.g. cash deposited into the bank, or cash withdrawn. Pick "from" and "to" accounts and the amount.તમારા પોતાના cash અને bank accounts વચ્ચે પૈસા ખસેડો — દા.ત. bank માં cash જમા, કે cash ઉપાડ. "from" અને "to" account અને રકમ પસંદ કરો.
JournalJournal
A manual accounting entry for adjustments not covered by other screens. Enter debit and credit lines; the entry saves only when debit equals credit.બીજા screens માં ન આવતા adjustment માટે manual હિસાબી entry. Debit અને credit lines નાખો; debit = credit હોય ત્યારે જ entry save થાય.
Expensesખર્ચ
Trial BalanceTrial Balance
A list of all ledger heads with debit and credit totals as of a date. A green Balanced badge means your books are healthy (total debit = total credit). Click any row to see that account's ledger.તારીખ પ્રમાણે દરેક ledger head ના debit-credit total ની યાદી. લીલો Balanced badge એટલે તમારા ચોપડા તંદુરસ્ત છે (કુલ debit = કુલ credit). કોઈપણ row પર ક્લિક કરી તે account નું ledger જુઓ.
Reportsરિપોર્ટ્સ
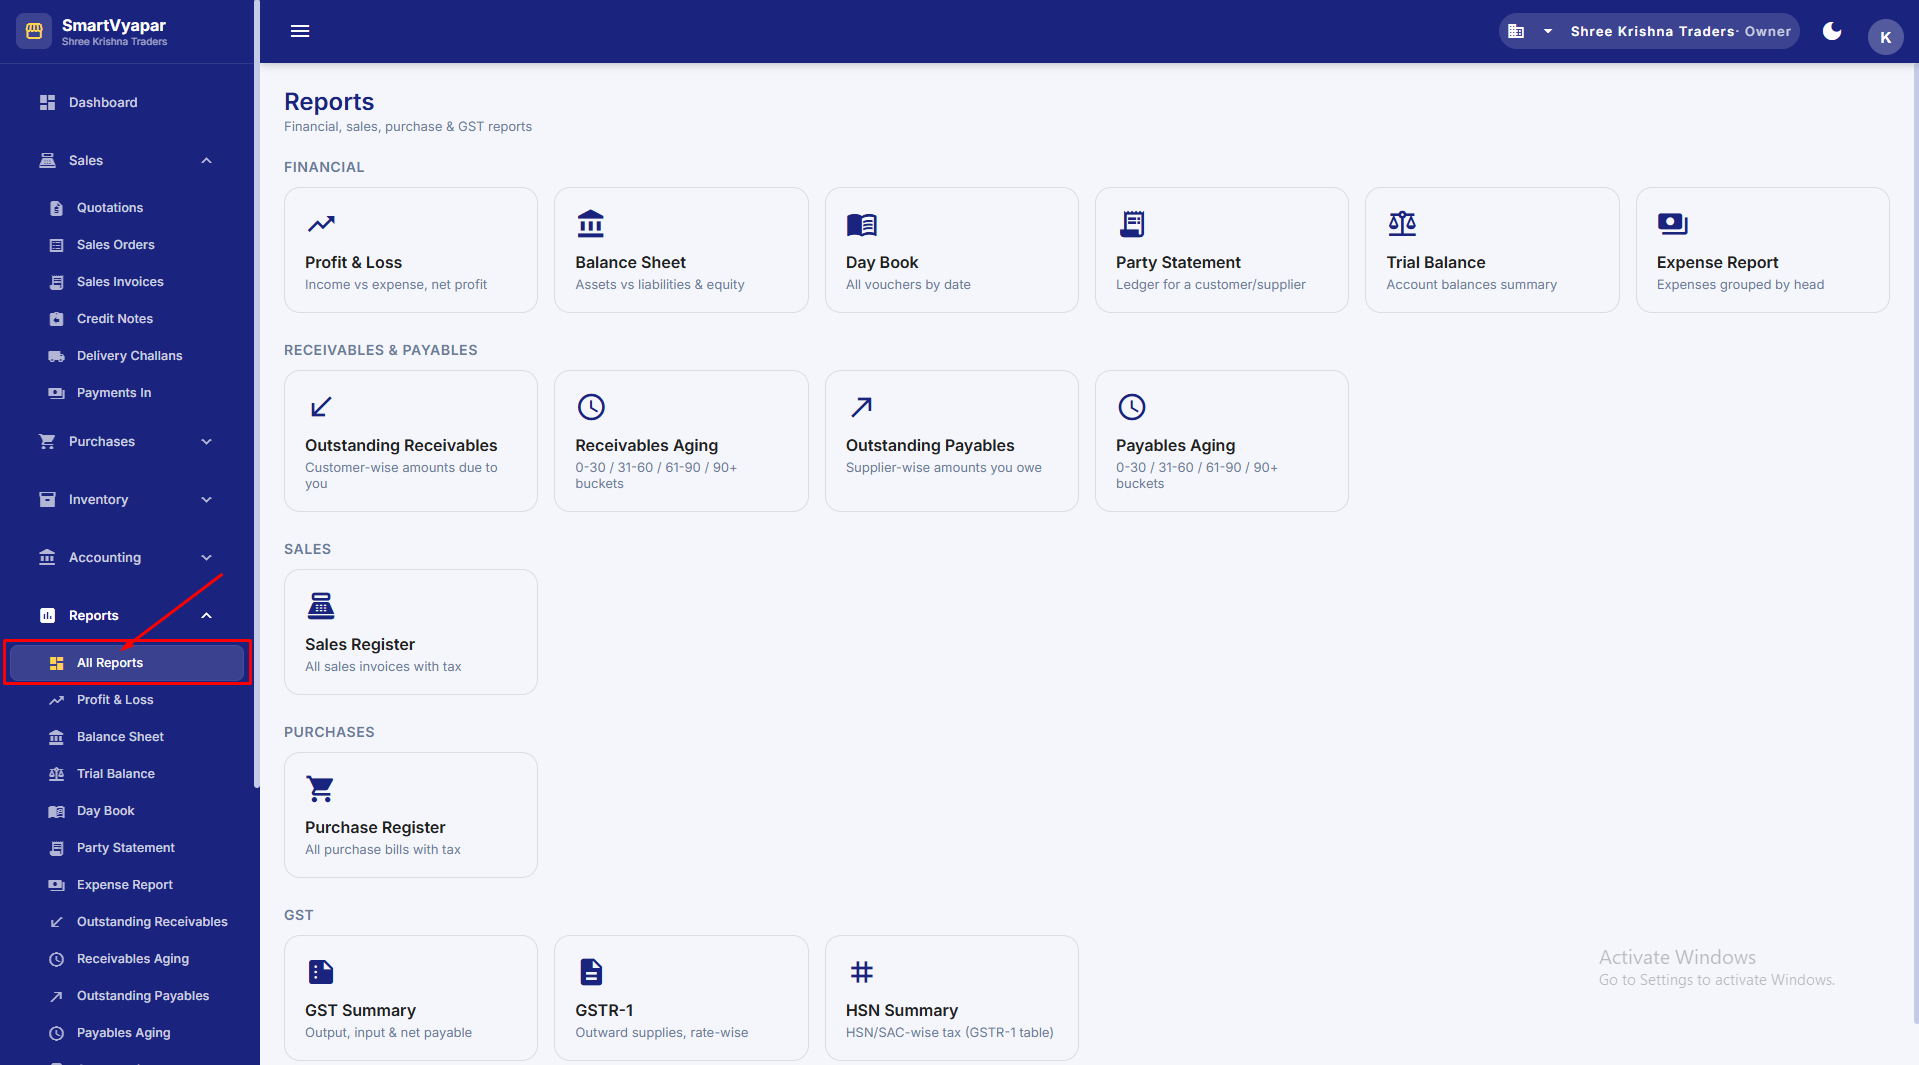
Understand your business and stay GST-ready. Open the Reports hub and pick a report; set the date range and view.તમારો ધંધો સમજો અને GST-ready રહો. Reports hub ખોલી રિપોર્ટ પસંદ કરો; તારીખ range સેટ કરી જુઓ.
Financial reportsનાણાકીય રિપોર્ટ
| Reportરિપોર્ટ | What it tells youશું કહે |
|---|---|
| Profit & Loss (P&L)Profit & Loss | Income vs expenses for a period → your net profit.સમયગાળાની આવક સામે ખર્ચ → તમારો ચોખ્ખો નફો. |
| Balance SheetBalance Sheet | What you own vs what you owe, as of a date. Assets = Liabilities + Equity.તારીખ પ્રમાણે તમારી પાસે શું છે સામે શું દેવું. Assets = Liabilities + Equity. |
| Day BookDay Book | Every transaction, day by day, in order.દરેક વ્યવહાર, દિવસવાર, ક્રમમાં. |
| Party StatementParty Statement | A single customer's/supplier's full ledger and running balance.એક ગ્રાહક/supplier નું આખું ledger અને running balance. |
| Expense ReportExpense Report | All expenses for a period, grouped by head (Rent, Salaries…) — where your money went.સમયગાળાના બધા ખર્ચ, head પ્રમાણે (ભાડું, પગાર…) — તમારા પૈસા ક્યાં ગયા. |
Receivables & Payablesલેવાના અને આપવાના
- Outstanding Receivables / Payables — who owes you and whom you owe, with totals.Outstanding Receivables / Payables — તમને કોણ ચૂકવવાનું છે અને તમારે કોને, total સાથે.
- Aging — splits dues into buckets (0–30, 31–60, 61–90, 90+ days) so you can chase overdue amounts.Aging — બાકીને buckets માં વહેંચે (0–30, 31–60, 61–90, 90+ દિવસ) જેથી overdue રકમ વસૂલી શકો.
GST reportsGST રિપોર્ટ
| Reportરિપોર્ટ | Useઉપયોગ |
|---|---|
| GSTR-1 | Rate-wise outward sales (B2B/B2C) for filing GSTR-1.GSTR-1 ભરવા માટે rate-પ્રમાણે outward વેચાણ (B2B/B2C). |
| GST SummaryGST Summary | Output GST vs Input GST (ITC) → net GST payable (GSTR-3B style).Output GST સામે Input GST (ITC) → ચોખ્ખો GST payable (GSTR-3B શૈલી). |
| HSN SummaryHSN Summary | Sales grouped by HSN code & rate — the HSN table needed on the return.HSN code અને rate પ્રમાણે વેચાણ — return પર જરૂરી HSN table. |
| Sales / Purchase RegisterSales / Purchase Register | Voucher-wise list with GST columns and totals.GST columns અને total સાથે voucher-પ્રમાણે યાદી. |
Documents (PDF)દસ્તાવેજ (PDF)
Print, download and share professional GST documents.Professional GST દસ્તાવેજ print, download અને share કરો.
Printing & downloadingPrint અને download
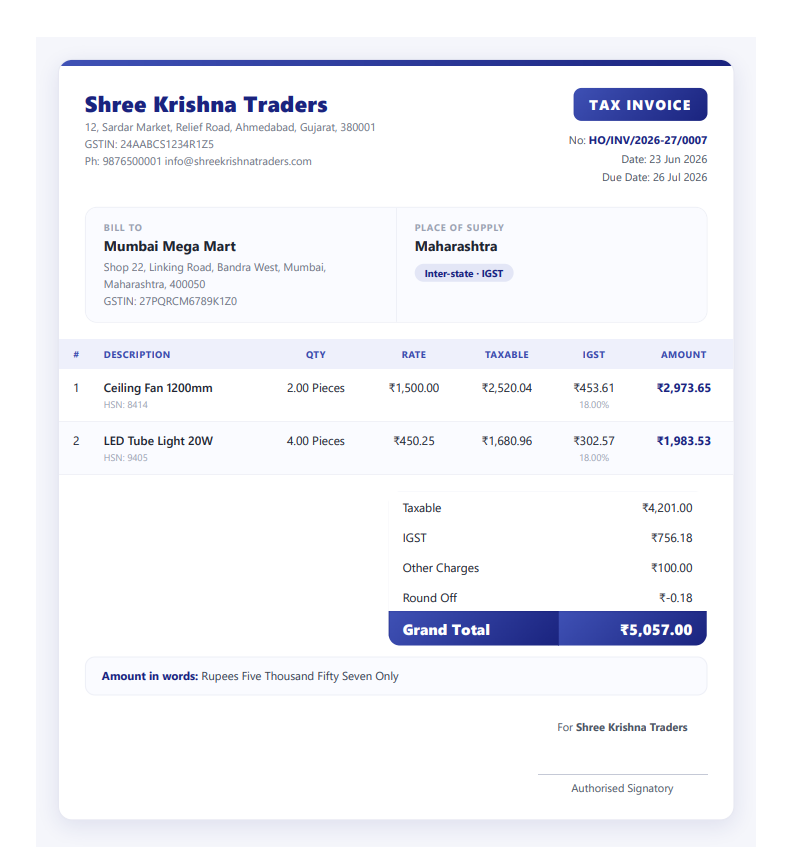
Open any Sales Invoice, Purchase Invoice, Quotation, Credit Note or Debit Note. On the detail screen you'll see:કોઈપણ Sales Invoice, Purchase Invoice, Quotation, Credit Note કે Debit Note ખોલો. Detail screen પર તમને દેખાશે:
- PDF / Print — opens a clean, GST-formatted document to preview or print.PDF / Print — preview કે print માટે સ્વચ્છ, GST-formatted દસ્તાવેજ ખોલે.
- Download — saves the PDF to your device to email or share.Download — email કે share કરવા PDF તમારા device પર સાચવે.
The document shows your company header & GSTIN, the party details, item lines with HSN and CGST/SGST or IGST, totals, amount in words, and a signature area.દસ્તાવેજ તમારી company header અને GSTIN, party વિગતો, HSN સાથે item lines અને CGST/SGST કે IGST, totals, રકમ શબ્દોમાં, અને signature જગ્યા બતાવે.
Attachmentsજોડાણ (Attachments)
On most detail screens (invoices, payments, parties…) you can attach files — a supplier's bill photo, a cheque image, an agreement. Use the Attachments panel to upload, download or remove them.મોટાભાગના detail screens (invoice, payment, party…) પર તમે files જોડી શકો — supplier ના bill નો ફોટો, cheque ની image, કરાર. Attachments panel થી upload, download કે remove કરો.
Settings & Adminસેટિંગ્સ અને એડમિન
Control who can do what, and review everything that happens.કોણ શું કરી શકે તે નિયંત્રિત કરો, અને જે થાય તે બધું સમીક્ષા કરો.
Roles & permissionsRoles અને permissions
A role is a set of permissions. Built-in roles (Owner, Admin, Accountant, Cashier, Salesperson, Viewer) cover most needs. You can also create a custom role and tick exactly which permissions it has.Role એટલે permissions નો સમૂહ. Built-in roles (Owner, Admin, Accountant, Cashier, Salesman, Viewer) મોટાભાગની જરૂર પૂરી કરે. તમે custom role પણ બનાવી, કયા permissions છે તે બરાબર tick કરી શકો.
Team (members & invites)Team (members અને invite)
Audit LogAudit Log
A record of who did what and when — created, changed or cancelled documents. Filter by date, action or type. Useful to track team activity and resolve "who changed this?" questions.કોણે, શું, ક્યારે કર્યું તેનો રેકોર્ડ — દસ્તાવેજ બનાવ્યા, બદલ્યા કે cancel કર્યા. તારીખ, action કે type થી filter કરો. team પ્રવૃત્તિ track કરવા અને "આ કોણે બદલ્યું?" ઉકેલવા ઉપયોગી.
FAQ & GlossaryFAQ અને શબ્દાવલિ
Quick answers and the meaning of common terms.ઝડપી જવાબ અને સામાન્ય શબ્દોના અર્થ.
Common questionsસામાન્ય સવાલો
| Questionસવાલ | Answerજવાબ |
|---|---|
| I made a wrong invoice. What do I do?મેં ખોટું invoice બનાવ્યું. શું કરું? | Open it and Cancel — stock and accounts reverse — then create a correct one.એ ખોલી Cancel કરો — સ્ટોક અને હિસાબ ઉલટાય — પછી સાચું બનાવો. |
| A sale won't save — "insufficient stock".વેચાણ save નથી થતું — "insufficient stock". | You're out of stock. Buy/adjust stock, or turn on Allow negative stock in Preferences.સ્ટોક ખલાસ છે. સ્ટોક ખરીદો/adjust કરો, કે Preferences માં Allow negative stock ચાલુ કરો. |
| My report shows no data.મારા રિપોર્ટમાં data નથી. | Check the date range at the top of the report.રિપોર્ટની ઉપરની તારીખ range તપાસો. |
| A team member can't see a screen.Team member ને screen દેખાતું નથી. | Their role lacks that permission. Adjust the role in Settings → Roles.તેમના role પાસે એ permission નથી. Settings → Roles માં role બદલો. |
| How do I move from Vyapar/another app?Vyapar/બીજા app પરથી કેમ આવું? | Use Settings → Import data for parties & items, plus opening balances (see section 2).parties અને items માટે Settings → Import data, સાથે opening balances વાપરો (section 2 જુઓ). |
Glossaryશબ્દાવલિ
| Termશબ્દ | Meaningઅર્થ |
|---|---|
| GSTIN | Your 15-character GST registration number.તમારો 15-અક્ષરનો GST registration number. |
| CGST / SGST | The two halves of GST charged on sales within your state.તમારા રાજ્યમાં વેચાણ પર લાગતા GST ના બે ભાગ. |
| IGST | GST charged on sales to another state.બીજા રાજ્યને વેચાણ પર લાગતો GST. |
| HSN / SAC | The standard code for a product (HSN) or service (SAC) used in GST.GST માં product (HSN) કે service (SAC) માટેનો standard code. |
| ITC | Input Tax Credit — GST you paid on purchases that you can set off against GST collected.Input Tax Credit — ખરીદી પર ભરેલો GST જે વસૂલેલા GST સામે set-off કરી શકાય. |
| Tax InvoiceTax Invoice | A GST invoice with tax. (Bill of Supply = without tax, for non-GST/exempt.)tax સાથેનું GST invoice. (Bill of Supply = tax વગર, non-GST/exempt માટે.) |
| LedgerLedger | A running record of all amounts for one account or party.એક account કે party ની બધી રકમનો running રેકોર્ડ. |
| VoucherVoucher | Any numbered document (invoice, payment, journal…).કોઈપણ numbered દસ્તાવેજ (invoice, payment, journal…). |
| Opening balanceOpening balance | What existed before you started using SmartVyapar (party dues, stock, cash).SmartVyapar વાપરતા પહેલા જે હતું (party બાકી, સ્ટોક, cash). |